Upload project experimental data
To upload data into CKG you will generally use 3 files:
Experimental design: identifiers used for subjects, biological samples and analytical samples
Clinical data: metadata associated to the subjects in the cohort
Experiment data (proteomics, phosphoproteomics, interactomics): output format from processing tools
Example files are available in the data directory: https://github.com/MannLabs/CKG/blob/master/data/example_files.zip
Prepare data for upload
Experimental Design

Experimental Design file example
Open the Experimental Design excel file, automatically downloaded when the project was created, and fill in the columns for subject external_id, biological_sample external_id, analytical_sample external_id, grouping1, `grouping2`* and `batch`*.
grouping1: Annotated grouping of each sample.
grouping2: If there are more than one grouping (two independent variables) use this column to add a second level (*optional).
batch: You can add information about the batch were each sample was run in case you want to correct for possible batch effects (*optional)
The identifiers provided in this file must correspond to the identifiers used in the Clinical Data file, and to the column names in the Proteomics files (see below).
Warning
Make sure, within each column, the identifiers are unique. This means, if you have a subject “KO1”, no other subject can have the same identifier, but you can have a biological sample and/or analytical sample “KO1”.
Clinical Data

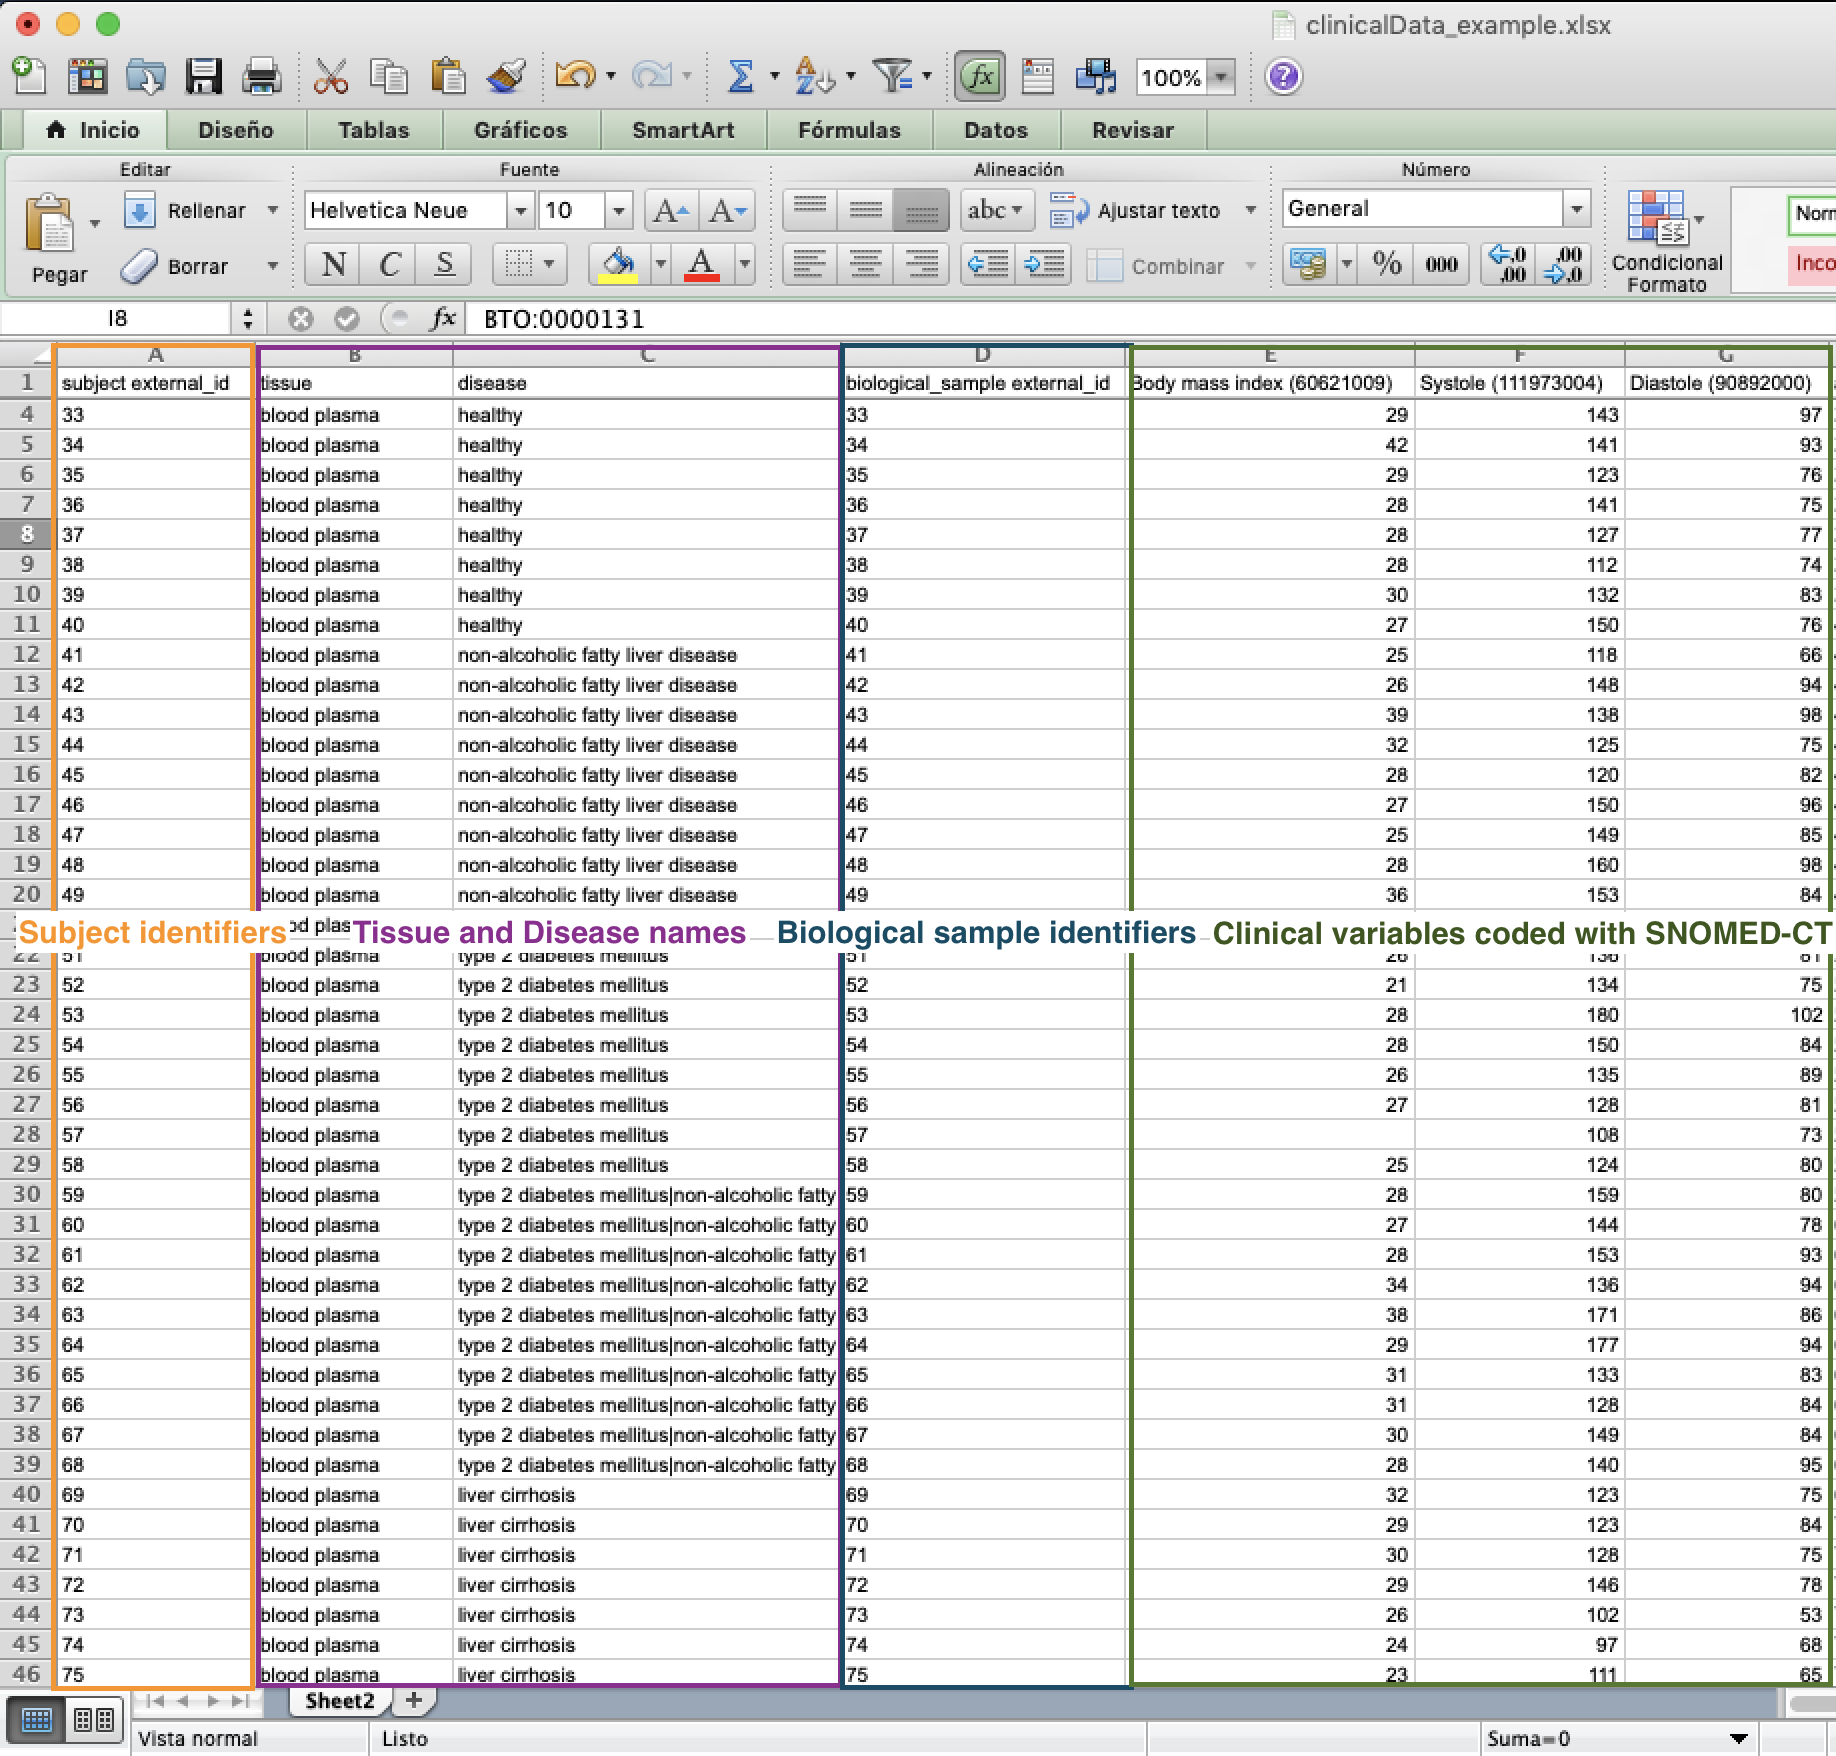
Clinical Data file example
Open the Clinical Data excel file, automatically downloaded when the project was created, and fill in as much information as you can. Be aware that the following columns are mandatory to fill in:
subject external_id: This is the identifier your subject has in your study so far (same identifiers as used in Experimental Design, subject external_id).
tissue: This is the name of the tissue each sample came from. Make sure it is also one of the tissues selected during Project creation.
disease: This should match the disease(s) you selected from the drop-down menu in the Project creation.
biological_sample external_id: This is the identifier of the sample taken from your subject, if you have both blood and urine for every subject, you should correspondingly have two biological sample identifiers for each subject identifier (same identifiers as used in Experimental Design, biological_sample external_id).
biological_sample quantity: Amount of biological sample.
biological_sample quantity_units: Unit.
analytical_sample external_id: If multiple analyses were performed on the same biological sample, eg. proteomics and transcriptomics, there should be multiple analytical sample identifiers for every biological sample (same identifiers as used in Experimental Design, analytical_sample external_id).
analytical_sample quantity: Amount of sample used in the experiment.
analytical_sample quantity_units: Unit.
Please use SNOMED terms as headers for every new column you add. This will be used to gather existing information about the type of data you have. To find an adequate SNOMED term for your clinical variables, please visit the SNOMED browser.
Note
To add a column with “Age” search for “age” in the SNOMED browser. This gives multiple matches, with the first one being: “Age (qualifier value), SCTID:397669002”. Please enter this information as your clinical variable column header with the SCTID in parenthesis: Age (qualifier value) (397669002)
Warning
If an adequate SNOMED term is not available, you can define extra terms and relationships by defining two files in the data/ontologies/SNOMED-CT directory:
extra_entities.tsv: Tabulated file with additional terms. This file should have the following fields:
identifier: identifier for the new term, created manually (recommended format: EXXXXXXXXX)
type: Clinical_variable
name: name of the variable
description: description of the variable
code number: -40
synonyms: alternative names
For example:
E000000000 |
Clinical_variable |
NAFLD score |
Score used in the clinic to define the grade of fibrosis in the liver |
-40 |
Fibrosis score,Non-alcoholic Fatty Liver Disease score |
extra_rels.tsv: Tabulated file with relationships of the new terms. This file should have the following fields:
identifier1: first node in the relationship
identifier2: second node in the relationship
type: type of relationship (generally for ontologies HAS_PARENT)
E000000000 |
273249006 |
HAS_PARENT |
When running import and loading (graph database update) for ontologies, these new terms will be added to the graph (ask your admin for new updates).
Note
This format is valid also for other ontologies when missing terms.
Note
When you consider that an Onotology is missing relevant terms or relationships, we encourage you to contact the people behind the Ontology for them to include the missing information. This will help maintain the Ontology active and up to date. Ontologies and terminologies are generally open source projects and the participation of the community is important. For instance, here GeneOntology describes how you can contribute to the GO terminology.
Additional columns:
timpeoint: To be used in the case of a longitudinal study. This is a relative measure within your samples timepoints. For example, if your timepoints are years 2015, 2016, 2017, 2018 and 2019, you would use “0”, “1”, “2”, “3” and “4” as values in this column.
timepoint units: Unit in which your timepoint is measured (e.g. “hours”, “days”, “years”).
had_intervention: If a subject has been subjected to a determined medical intervention. For now, select only drugs that have been given to the subject (e.g. “327032007”). Use an appropriate SNOMED SCTID value.
had_intervention_type: This is the type of intervention applied to a subject. “drug treatment” is the only value available for now.
had_intervention_in_combination: Boolean. If True, requires more than one value in had_intervention.
had_intervention_response: “positive” or “negative”.
studies_intervention: A medical intervention under study in the project. For example, study subjects before and after stomach bypass (SCTID:442338001). Use an appropriate SNOMED SCTID value.
Note
CKG allows the upload of clinical data using the SDRF format (https://github.com/bigbio/proteomics-metadata-standard). CKG will transform this format into CKG experimental design and clinical data files converting the EFO ontology used in SDRF to SNOMED-CT terms.
Proteomics data
MaxQuant: Use “proteinGroups.txt”, “peptides.txt” and “Oxidation (M)Sites.txt” files, and any other relevant MaxQuant output files.
Spectronaut: Use “proteinGroupsReport.xlsx”. When exporting the results table from Spectronaut, please select “PG.ProteinAccessions” and “PG.Qvalue” under Row Labels, and under Cell Values select “PG.Quantity”, “PG.NrOfStrippedSequencesMeasured”, “PG.NrOfStrippedSequencesIdentified”, “PG.NrOfPrecursorsIdentified”, “PG.IsSingleHit”, “PG.NrOfStrippedSequencesUsedForQuantification”, “PG.NrOfModifiedSequencesUsedForQuantification”, “PG.NrOfPrecursorsUsedForQuantification”, “PG.MS1Quantity” and “PG.MS2Quantity”.
FragPipe: Use “combined_proteins”.
Dia-NN: Use “report_final.pg_matrix”.
MzTab: CKG extracts the different matrices based on rows: PRT (proteins), PEP (peptides), PSM (modifications)
As long as you provide a correct Experimental design where the analytical sample external ids correspond to the samples in your proteomics files, CKG will map those identifiers correctly. We suggest to use the following notation for analytical samples:
TechnicalReplicateNumber_AnalyticalSampleIdentifier
Do not perform any post-processing filtering, imputations or similar on your data before uploading it. This will be carried out by the CKG. In the case of Spectronaut outputs, the missing values are automatically replaced by the keyword “Filtered”.
You can proceed to Upload Data when you have prepared your experimental design file, clinical and proteomics data.
Upload Data

Data Upload App
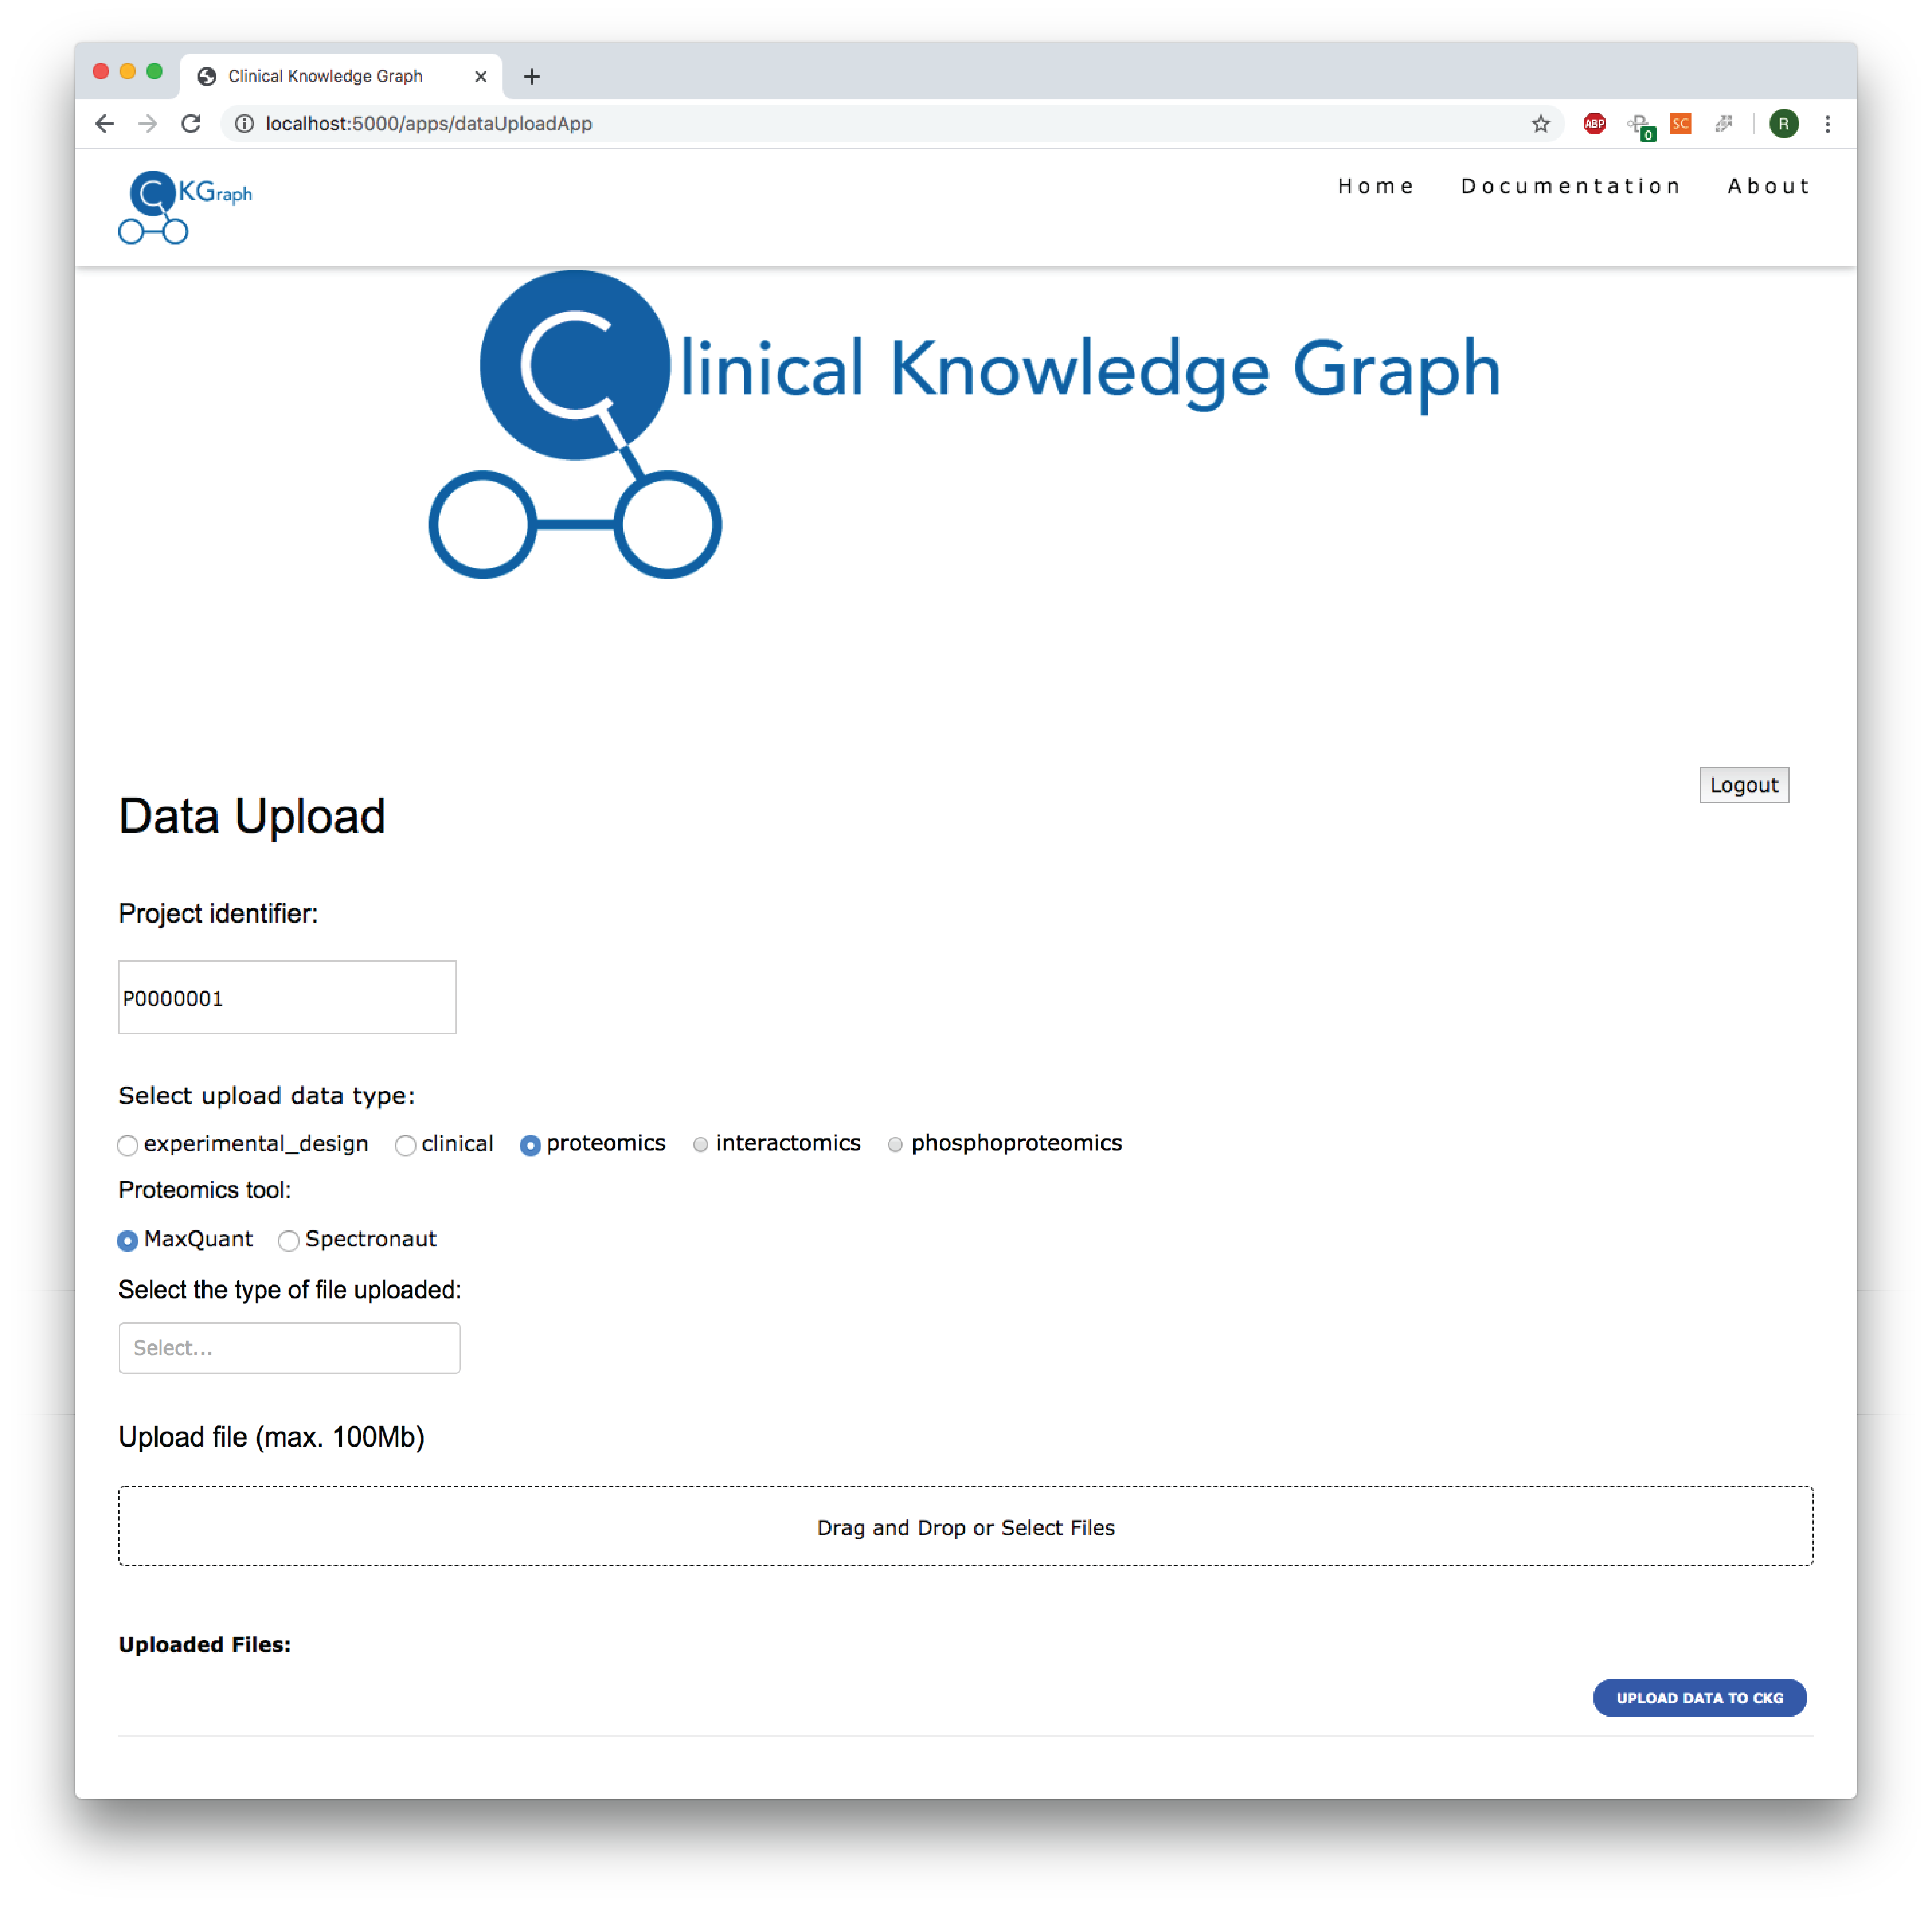
In order to make data uploading simple, we created an app that takes care of this in only a few steps:
Go to dataUploadApp or use the Data Upload button in the homepage app, and follow the steps.
Fill in
Project identifierwith your project external identifier from Project creation and press Enter. (1) If the project identifier does not exist in the database, you will get and error. Otherwise, the menus below will unlock.Select the type of data you will upload first. (2)
If
proteomics,interactomicsorphosphoproteomicsis selected, please also select the processing tool used (MaxQuant,Spectronaut,FragPipe,DIA-NNorMzTab) (2a), as well as the type of file to be uploaded (Protein groups,PeptidesorPhospho STY sites) (2b).
Drag and drop or select the file to upload to the selected data type and file type. (3)
If you want to upload, for example, both protein groups and peptides from a proteomics experiment, follow the steps 2. and 3. for each file type to be uploaded.
Select another data type to upload (2), and drag and drop or select the files to upload (3).
When you have uploaded all the relevant files, click
UPLOAD DATA TO CKG(4). After this button is clicked, it will deactivate all the menus. To restore its function, insert the project identifier and go through the previous steps again.Once the data is uploaded, a new button will show under
UPLOAD DATA TO CKG. ClickDownload Uploaded Files (.zip)to download all the upload files in a compressed format.
Note
When the files are uploaded, the filenames are shown under Uploaded Files:
To replace the files uploaded, just select the correct data type and processing tool, and reselect the files again.